Lỗi “HTTP 500.19 Errors in IIS 7” khi tạo website hay virtual directory trỏ theo đường dẫn UNC

Source: http://www.jlgaines.net/2011/05/http-50019-errors-in-iis-7-site-is-on.html

I was tinkering around my IIS 7 which comes on my Windows 7 Guest on VMWare fusion. I have my web application stored on my Mac Drive and IIS on VMWare. Apparently, when I try to share the drive via VMWare share to Windows, and I try to browse the site, I get this error :

HTTP Error 500.19 – Internal Server Error
Description: The requested page cannot be accessed because the related configuration data for the page is invalid.
Error Code: 0x8007052e
Notification: BeginRequest
Module: IIS Web Core
Requested URL: http://localhost/
Logon User: Not yet determined

Logon Method: Not yet determined
Handler: Not yet determined
Config Error: Cannot read configuration file
Config File: \\?\UNC\vmware-host\webapp


So how I made it work ? We must not use VMWare sharing but instead use Mac OSX Samba Sharing.
MAC OS X Instructions

  1. Create an account called IIS_UsrAccess on Mac OSX (or any account). Make sure that this is a sharing account for security. Remember the password you used on Mac OSX.
  2. Go to System Preference -> Sharing
  3. Tick on File Sharing
  4. Click on Options
  5. Tick : Share files and folders using SMB (Windows)
  6. On the account below, choose IIS_UsrAccess
  7. Click on Done
  8. Add a the folder you want to share to Windows under Shared Folders
  9. On the users, add IIS_UsrAccess and choose Read or Read and Write.
  10. Close.
  11. Browse the Folder via Finder
  12. Under the folder you shared, right click and choose Get Info
  13. Below, you would see Sharing and Permissions as shown here :
14. Add iss_usraccess. Now depending on the priviledge you want to grant, it could be read only or read and write.
15. Locate your web.config file on this app and do the same as point 14. If you want to manage web.config from IIS, choose read and write for iis_usraccess account.
Now we’re done on Mac OSX. We will now go to windows.
  1. Test first on your Windows if you are able to access the shared folder by going to Windows Explorer and \\\. Example, on my machine I typed \\MyMac\Web and I’m able to browse the folder.
  2. Create an iis_usraccess account on Windows and use the same password you used on Mac OSX. This is to allow account pass through.
  3. Once this is done, go to IIS Manager.
  4. Create an Application by doing Add Application or Create a Virtual Directory by clicking Add Virtual Directoy (I Assumed you already have a site
  5. On Alias, choose whatever alias you want. On Physical Path, choose \\\.
  6. Click on Connect As… and on new window, type in Specific User and then click on Set. Once Set is clicked, type in on the Username iis_usraccess and password of the user you created on windows and mac os x.
  7. Once done, click on Test Settings.
  8. It should be both green, meaning you are now able to browse the site

Hướng dẫn cơ bản về 9-patch cho Android UI

Trong quá trình tìm hiểu và phát triển ứng dụng cho Android. Tôi được biết tới 9-patch image. Ban đầu chưa làm gì tới nên tôi bỏ qua. Giờ đây có một dự án liên quan tới nó nên tôi phải đi tìm hiểu xem nó là gì, làm việc như thế nào và tạo ra bằng cách nào.

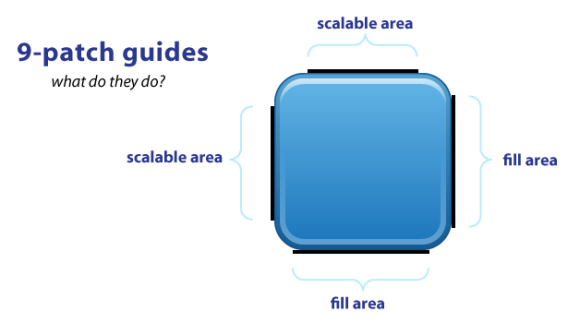
Về cơ bản, 9-patch sử dụng png transparency để tạo một dạng tiên tiến của 9-slice hoặc scale9. Guild map, là các đoạn thẳng đen 1-pixel vẽ trên cạnh của hình, nó định nghĩa vùng lặp lại (scaleable area) và vùng phủ lấp (fill area) của ảnh. Bằng cách đặt tên file ảnh là name.9.png, Android sẽ nhận ra được định dạng 9.png và sử dụng đường hướng dẫn đen để lặp (scale) và phủ lấp (fill) ảnh bitmap.

Dưới đây là một guild map cở bản:

Image

Trong hình trên, ta có các đường hướng dẫn (guild) ở mỗi cạnh của hình. Các guild bên TRÊN (TOP) và bên TRÁI (LEFT) ảnh định nghĩa vùng có thể lặp lại (scaleable area) của ảnh, các guild bên PHẢI (RIGHT) và bên DƯỚI (BOTTOM) định nghĩa vùng phủ lấp (fill area) của ảnh.

– Các đường hướng dẫn màu đen sẽ bị loại khỏi ảnh – chúng sẽ không xuất hiện trong ứng dụng.

– Các đường hướng dẫn phải là các đường có độ rộng 1 pixel. Nếu như một nút nhấn kích thước 48×48 thì 9-patch png của nó sẽ có kích thước thật là 50×50.

– Các đường hướng dẫn phải là màu đen hoàn toàn (#000000). Thậm chí chỉ một sự khác biệt nhỏ trong thuộc tính màu sắc (color) hoặc độ trong suốt (alpha) cũng sẽ là nguyên nhân khiến nó thể hiện không đúng và bị căng ra (stretch) theo cách thông thường.

– Cũng phải luôn ghi nhớ rằng, vùng còn lại của đường viền 1-pixel phải hoàn toàn trong suốt. Như vậy là bao gồm cả 4 góc của ảnh.

Image

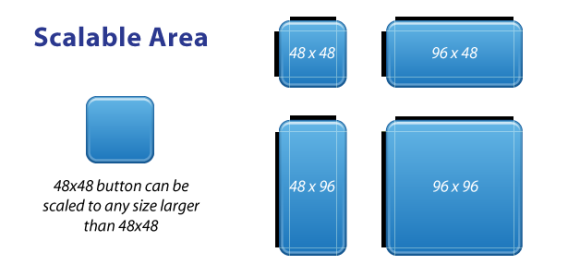
Các đường hướng dẫn bên TRÊN và bên TRÁI được sử dụng để định nghĩa vùng lặp lại của ảnh – Bên TRÁI là định nghĩa vùng lặp theo chiều cao, bên TRÊN định nghĩa vùng lặp theo chiều rộng. Sử dụng hình ảnh một nút nhấn làm ví dụ, như vậy có nghĩa là nút nhấn có thể căng theo chiều ngang và dọc bên trong vùng màu đen và mọi thứ khác như các  góc, sẽ được giữ nguyên kích thước. Điều này cho phép nút nhấn có thể mở rộng tới bất kỳ kích thước nào mà vẫn duy trì sự thống nhất về hình ảnh.

Ghi nhớ một điều quan trọng là các ảnh 9-patch không thu hẹp được, chúng chỉ có thể mở rộng ra. Vì vậy hãy tạo ảnh có kích thước nhỏ nhất có thể.

Ngoài ra, ta có thể bỏ đi một vài phần ở giữa của đường hướng dẫn vùng lặp. Ví dụ, nếu ta có một nút nhấn với một cạnh bóng láng xuyên qua giữa của nút nhấn, ta có thể bỏ đi một vài pixel ở giữa của đường hướng dẫn bên TRÁI. Trung tâm trục ngang của ảnh sẽ không được lặp, chỉ có các phần bên trên và bên dưới của nó được lặp lại, như vậy hình của của sẽ không bị răng cưa và mờ.

Image

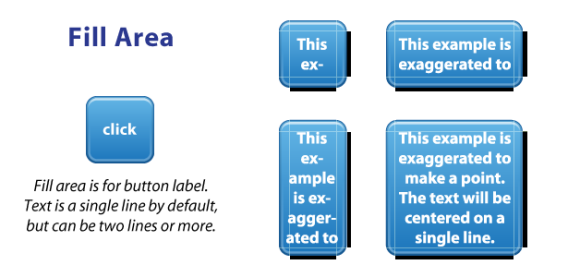
Các đường hướng dẫn lấp đầy là tùy chọn và cung cấp một cách thức để xác định vùng sản phẩm như text label. Vùng phủ lấp xác định bao nhiêu vị trí trong ảnh để đặt text, icon, hoặc các thứ khác, 9-patch không chỉ cho các nút nhấn, nó cũng còn được dùng như các ảnh nền.

Ví dụ về button và label bên trên được phóng đại để giải thích ý tưởng về sự phủ lấp (fill). Thực tế mà nói, tôi không có kinh nghiệm về cách mà Android làm việc với multi-line label. Thông thường, một nút nhấn hoặc label chỉ bao gồm một dòng text.

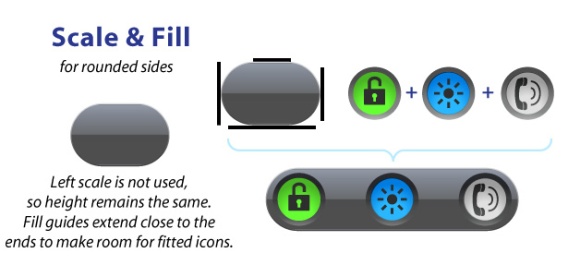
Cuối cùng, dưới đây là một demo tốt cho thấy cách mà các đường hướng dẫn mở rộng và phủ lấp làm việc, chẳng hạn như một LinearLayoit với một hình nền và các góc bo tròn.

Image

Với ví dụ này, đường hướng dẫn bên TRÁI không được sừ dụng, nhưng chúng ta vẫn buộc phải có. Ảnh nền không lặp theo chiều dọc; Nó chỉ lặp theo chiều ngang (dựa vào đường hướng dấn TRÊN). Hãy chú ý tới các đường hướng dẫn phủ lấp bên PHẢI và DƯỚI, mỏ rộng ra ngoài cho tới khi gặp các cạnh cong của ảnh. Việc này cho phép ta đặt các nút tròn gần với các cạnh của hình nền cho một cảm giác nhìn chặt chẽ và khít.

9-patch thật đơn giản đúng không! ^^

Để hiểu rõ hơn về 9 patch image và cách tạo ra nó như thế nào, xin hãy nhẫn vào link bên dưới:

Android 9 Patch Image Tutorial

Giải quyết vấn đề chạy Crystal Report với asp.net trên iis

Crystal Report được sử dụng khá phổ biến trong các ứng dụng Web ASP.NET, để tạo và xuất báo cáo thành file.

Tuy nhiên khi deploy lên Web Server (IIS) thì thường gặp lỗi không hiển thị được Crystal Report.

Nếu điều đó xảy ra với bạn thì có thể hướng dẫn dưới đây sẽ giúp được bạn:

B1: Download Cài đặt Crystal Report Runtime Engine for .NET Framework.

Bản 32 bit

Bản 64 bit

Xem chi tiết update tại: http://scn.sap.com/docs/DOC-7824

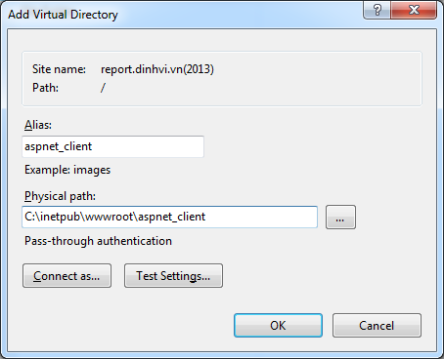
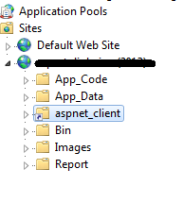
B2: Trên IIS, tìm tới ứng dụng web. Tạo Virtual Directory tại thư mục gốc (root). Alias = “aspnet_client”, Trỏ tới thư mục “C:\inetpub\wwwroot\aspnet_client”. Vì các file tài nguyên như, js,css, và hình ảnh phục vụ cho việc hiển thị Report nằm ở đó.

Image

Image

Cài đặt iOS SDK và Xcode trên Windows (7)

Apple đã cương quyết không chịu tạo ra một phiên bản iOS SDK hỗ trợ cho hệ máy chạy Windows. Nhưng thật may mắn là có một cách để có thể chạy iOS SDK và Xcode cho hầu hết các loại PC.

Các bước sau liên quan tới việc cài đặt một máy ảo (VM – virtual machine) trên PC của bạn, cập nhật VM lên 10.7, sau đó chạy VM rồi tải (download) và cài đặt (install) iOS SDK và Xcode trên VM.

Có các cách khác để cài đặt OS X trên máy của bạn nhưng chúng liên quan tới việc tạo một phân vùng mới và cài đặt Hệ điều hành trực tiếp lên ổ cứng của bạn. Các cách này khó khăn hơn và có nhiều bước khó hiểu có thể gây nguy hại cho máy tính của bạn. Cách làm trong bài viết này là dễ nhất và an toàn nhất.

Cả quá trình cài đặt sẽ mất khoảng 2-3 giờ, nhưng hầu hết thời gian làm giành cho việc download. Không mất bất cứ khoản chi phí nào cho việc này.
Hướng dẫn

1. Đầu tiên là nhấn vào đây để download và cài đặt phiên bản ảo hóa của OS X Lion lên PC của bạn. (Lưu ý: sử dụng VMWare Workstation 7.1.x trở lên)

2. Nếu bạn không có Apple Dev Account miễn phí thì có thể đăng ký ở đây. Bạn sẽ cần tới nó để có thể download Xcode 4.1 miễn phí. Trong OS X, mở App Store và download Xcode. Bạn có thể thấy được tiến trình download bên dưới Purchases tab.

3. Khi tiến trình hoàn tất sẽ có thông báo đã cài đặt xong nhưng điều đó chưa có nghĩa là đã xong thực sự. Mở thư mục Applications từ Finder. Double-click lên biểu tượng Install Xcode.

4. Làm theo hướng dẫn trên màn hình sau đó đợi cho tới khi việc cài đặt kết thúc.

5. Sau khi đã xong, nó sẽ tự khởi động. Nếu không ĐỪNG tìm iPhone SDK trên dock. Bạn cần mở ổ đĩa cứng. Sau đó Click vào Developer > Applications.

6. Bây giờ bạn sẽ thấy một biểu tượng của Xcode, click vào nó và bạn có thể bắt đầu lập trình ứng dụng.

Nếu không thấy biểu tượng, rất có thể là do không gian ổ cứng ảo không đủ. Hãy chắc chắn là bạn có tối thiểu 10GB bộ nhớ cho VM. Khởi động lại VM có thể là một cách khác.

Bây giờ bạn có thể bắt đầu viết code một ứng dụng cho riêng bạn. Ngôn ngữ bạn sẽ sử dụng cho việc lập trình là Objective-C. Nếu bạn không có kinh nghiệm về Objective-C thì bạn nên tìm hiểu thêm, có thể bắt đầu với TheNewBoston

Bạn có thể test ứng dụng của bạn trên iPhone simulator trong Xcode nhưng bạn sẽ không thể add ứng dụng vào thiết bị của bạn. Để add ứng dụng mà bạn đã tạo vào thiết bị của bạn thì cần phải làm hai tùy chọn sau.

Tùy chọn 1: Nếu bạn muốn submit ứng dụng của bạn lên App Store, bạn sẽ cần trả cho Apple 100$ cho một Official Developers Certificate. Việc này này sẽ cho phép bạn bán ứng dụng của bạn cho rất nhiều người khác mà Apple không bạn chế gì.

Tùy chọn 2: Nếu bạn không muốn trả 100$ cho Apple, bạn có thể phát triển ứng dụng của bạn cho Cydia (tương tự App Store). Tùy chọn này cũng sẽ cho phép bạn đưa ứng dụng của bạn vào iPhone.

Cydia là một App Store không chính thức cho phép người dùng đã jailbreak và muốn bán hoặc chia sẻ các ứng dụng của họ. Hầu như không có bất cứ hạn chws nào về các loại ứng dụng có thể add lên Cydia.

Để phát triển ứng dụng cho Cydia, bạn sẽ cần phải có một thiết bị đã jailbreak(Hướng dẫn jailbreak) và trước khi bạn bắt đầu phát triển ứng dụng của bạn, bạn cần phải Fake Code Signing for Xcode and sending App to Cydia.

Giải quyết vấn đề SQL Server transaction log (.LDF) files ngày càng lớn

Vấn đề:

Bỗng một ngày bạn thấy dung lượng ổ cứng chỉ còn lại rất ít. Sau một hồi kiểm tra thì phát hiện ra các file .LDF có kích thước quá lớn.

Giải pháp:

Thiết lập recovery mode của databases thành ‘simple’.

Các bước thực hiện như sau:

    1. Thực hiện full-backup database
      Chú ý: Điều này là rất quan trọng vì việc chuyển recovery mode từ full hay bulk-logged sang simple sẽ phá vỡ quá trình sao backup log. Do đó nên backup ngay trước khi chuyển đổi, việc này sẽ cho phép bạn có thể phục hồi lại trạng thái trước khi chuyển đổi nếu không may có vấn đề gì xảy ra. Sau khi chuyển đổi thì bạn nên định kỳ backup database để bảo vệ dữ liệu của bạn. [Source]
    2. Chuyển recovery mode thành SIMPLE.
      (xem thêm: What is simple recovery mode?)Chú ý quan trọng:

Simple recovery model cho phép khôi phục (restore) database tới thời điểm mà nó được backup gần nhất. Nó không cho phép khôi phục dữ liệu tại thời điểm trước khi xảy ra lỗi hay tại một thời điểm bất kỳ nào đó.”  [Source]

mssql_shrink_1

Set recover mode to simple
  1. Shrink the transaction log (.LDF) files.
    Don't forget to shrink
    Don’t forget to shrink

    ... the log files after changing the recovery mode.
    … the log files after changing the recovery mode.
  2. Thực hiện full-backup database.

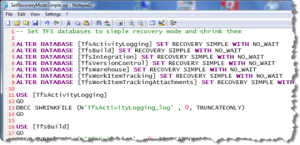
Đây là tùy chọn cho phép bạn có thể chạy một script thực hiện các công việc bên trên:

SQL Script
SQL Script

Delete, Shrink, Eliminate Transaction Log .LDF File

Theo thời gian, Microsoft SQL Server Database Transaction Log (.LDF) file sẽ trở lên rất lớn chiếm dung lượng hàng Gigabytes. Việc này gây lãng phí rất nhiều không gian ổ đĩa và có thể gây ra một số vấn đề khi bạn muốn sao lưu (backup) hay phục hồi (restore) database.

Khi đối mặt với vấn đề này chúng ta có thể thực hiện các phương thức sau (Ở đây sử dụng Microsoft SQL Server 2008 nhưng cũng có thể áp dụng cho Microsoft SQL Server 2005).

1. Shrink (thu nhỏ) transaction log (.ldf) file

Sử dụng phương thức này có thể thu nhỏ file log xuống kích thước mong muốn, ví dụ: 1MB

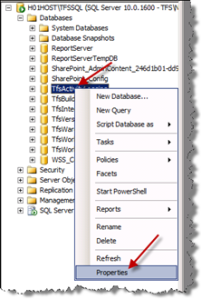
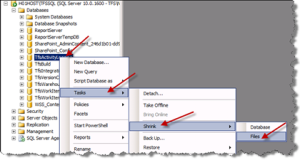
+ Right-click lên database bạn muốn thu nhỏ (shrink) => Tasks => Shrink => Files


Microsoft SQL Server 2008 Shrink

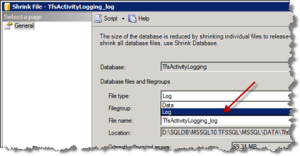
+ Trong giao diện Shrink File, chọn File type = Log và đánh dấu chọn Reorganize pages before releasing unused space sau đó thiết kích thước cho file log trong ô Shrink file to, ví dụ: 1 MB như trong hình:

Microsoft SQL Server 2008 Shrink Set Size Log FileMicrosoft SQL Server 2008 Shrink – Thiết lập kích thước log file

+ Nhân OK để thực hiện.

Ưu điểm của phương thức này là có thể thực hiện thu nhỏ ngay lập tức nhưng đôi khi nó không hoạt động với Microsoft SQL Server 2005. Khi đó hãy sử dụng phương thức thứ 2 – bên dưới.

2. Xóa hoàn toàn log file

Ý tưởng của phương thức này là xóa log file cũ (kích thước lớn) và tạo một log file mới với kích thước nhỏ nhất

Các bước thực hiện như sau:

1. Detach database

Right-click lên database => Tasks => Detach…

Microsoft SQL Server 2008 Detach
Microsoft SQL Server 2008 – Detach

2. Xóa log file cũ (file kích thước lớn)

This step will completely erase it from your hard drive. However, from my suggestion you should back up the log file somewhere, ex: rename it from the file location (my case is: C:\Program Files\Microsoft SQL Server\MSSQL10_50.MSSQLSERVER\MSSQL\DATA)

Bước này sẽ xóa toàn bộ log file cũ trên ổ đĩa cứng. Tuy nhiên để an toàn thì bạn nên sao lưu trước ra chỗ nào đó, hoặc đổi tên như hình dưới

Microsoft SQL Server 2008 Data Folder
Microsoft SQL Server 2008 – Data Folder

3. Attach database

As we deleted the log file, so we do attach the database without the log file. Don’t worry, SQL Server will create a new log file for you which will be of the minimum size. That’s perfect!

Vì log file đã bị xóa vì vậy ta sẽ attach database mà không có log file. SQL Server sẽ tạo một log file mới với kích thước nhỏ nhất.

+ Right-click lên Databases => Attach…

Microsoft SQL Server 2008 Attach
Microsoft SQL Server 2008 – Attach

+ Trong giao diệnA ttach Database, nhấn nút Add…

Microsoft SQL Server 2008 Attach AddMicrosoft SQL Server 2008 – Attach Add

+ Tìm đến và chọn database file (.mdf) sau đó nhấn OK

Microsoft SQL Server 2008 Browser MDF
Microsoft SQL Server 2008 – Tìm chọn database file .MDF

+ Chọn log file (.ldf) sau đó nhấn Remove

Microsoft SQL Server 2008 Attach Remove LogMicrosoft SQL Server 2008 – Attach Remove Log

+ Cuối cùng nhấn OK.

Ghi chú: sau khi hoàn thành các bước trên cần phải kiểm tra lại Data folder xem log file mới đã được tạo thật chưa. Nếu đã tạo thì xóa file sao lưu đi.

Nguồn: http://4rapiddev.com/sql-server/delete-shrink-eliminate-transaction-log-ldf-file/#ixzz1emkgIUzu

OpenLayers – Spherical Mercator

Spherical Mercator

This document describes the Spherical Mercator projection, what it is, and when you should use it. It includes some background information, demonstration of using the code with just a commercial layer, and how to add a WMS over the top of that layer, and how to reproject coordinates within OpenLayers so that you can reproject coordinates inside of OpenLayers. It is expected that readers of this tutorial will have a basic understanding of reprojection and a basic understanding of OpenLayers.

What is Spherical Mercator?

Spherical Mercator is a de facto term used inside the OpenLayers community – and also the other existing Open Source GIS community – to describe the projection used by Google Maps, Microsoft Virtual Earth, Yahoo Maps, and other commercial API providers.

This term is used to refer to the fact that these providers use a Mercator projection which treats the earth as a sphere, rather than a projection which treats the earth as an ellipsoid. This affects calculations done based on treating the map as a flat plane, and is therefore important to be aware of when working with these map providers.

In order to properly overlay data on top of the maps provided by the commerical API providers, it is neccesary to use this projection. This applies primarily to displaying raster tiles over the commercial API layers – such as TMS, WMS, or other similar tiles.

In order to work well with the existing commercial APIs, many users who create data designed for use within Google Maps will also use this projection. One prime example is OpenStreetMap, whose raster map tiles are all projected into the ‘spherical mercator’ projection.

Projections in GIS are commonly referred to by their “EPSG” codes, identifiers managed by the European Petroleum Survey Group. One common identifier is “EPSG:4326”, which describes maps where latitude and longitude are treated as X/Y values. Spherical Mercator has an official designation of EPSG:3857. However, before this was established, a large amount of software used the identifier EPSG:900913. This is an unofficial code, but is still the commonly used code in OpenLayers. Any time you see the string “EPSG:4326”, you can assume it describes latitude/longitude coordinates. Any time you see the string “EPSG:900913”, it will be describing coordinates in meters in x/y.

First Map

The first thing to do with the Spherical Mercator projection is to create a map using the projection. This map will be based on the Microsoft Virtual Earth API. The following HTML template will be used for the map.


<html>
<head>
 <title>OpenLayers Example</title>
 <script src='http://dev.virtualearth.net/mapcontrol/mapcontrol.ashx?v=6.1'></script>
 <script src="http://openlayers.org/api/OpenLayers.js"></script>
 </head>
 <body>
 <div style="width:100%; height:100%" id="map"></div>
 <script defer='defer' type='text/javascript'>
 // Code goes here
 </script>
 </body>
</html>


Ex. 1: HTML Template

The next step is to add the default Microsoft Virtual Earth layer as a base layer to the map.

var map = new OpenLayers.Map('map'); var layer = new OpenLayers.Layer.VirtualEarth("Virtual Earth",  {      sphericalMercator: true,      maxExtent: new OpenLayers.Bounds(-20037508.34,-20037508.34,20037508.34,20037508.34)  }); map.addLayer(layer); map.zoomToMaxExtent();

This creates a map. However, once you have this map, there is something very important to be aware of: the coordinates that you use in setCenter are not longitude and latitude! Instead, they are in projected units – meters, in this case. This map will let you drag around, but without understanding a bit more about spherical mercator, it will be difficult to do anything more with it.

This map has a set of assumptions about the maxResolution of the map. Specifically, most spherical mercator maps use an extent of the world from -180 to 180 longitude, and from -85.0511 to 85.0511 latitude. Because the mercator projection stretches to infinity as you approach the poles, a cutoff in the north-south direction is required, and this particular cutoff results in a perfect square of projected meters. As you can see from the maxExtent parameter sent in the constructor of the layer, the coordinates stretch from -20037508.34 to 20037508.34 in each direction.

The maxResolution of the map defaults to fitting this extent into 256 pixels, resulting in a maxResolution of 156543.0339. This is handled internally by the layer, and does not need to be set in the layer options.

If you are using a standalone WMS or TMS layer with spherical mercator, you will need to specify the maxResolution property of the layer, in addition to defining the maxExtent as demonstrated here.

Working with Projected Coordinates

Thankfully, OpenLayers now provides tools to help you reproject your data on the client side. This makes it possible to transform coordinates from Longitude/Latitude to Spherical Mercator as part of your normal operation. First, we will transform coordinates for use within the setCenter and other calls. Then we will show how to use the displayProjection option on the map to modify the display of coordinate data to take into account the projection of the base map.

Reprojecting Points, Bounds

To do this, first create a projection object for your default projection. The standard latitude/longitude projection string is “EPSG:4326” – this is latitude/longitude based on the WGS84 datum. (If your data lines up correctly on Google Maps, this is what you have.)

You will then be creating an object to hold your coordinates, and transforming it.

var proj = new OpenLayers.Projection("EPSG:4326"); var point = new OpenLayers.LonLat(-71, 42); point.transform(proj, map.getProjectionObject());

The point is now projected into the spherical mercator projection, and you can pass it to the setCenter method on the map:

map.setCenter(point);

This can also be done directly in the setCenter call:

var proj = new OpenLayers.Projection("EPSG:4326"); var point = new OpenLayers.LonLat(-71, 42); map.setCenter(point.transform(proj, map.getProjectionObject()));

In this way, you can use latitude/longitude coordinates to choosing a center for your map.

You can use the same technique for reprojecting OpenLayers.Bounds objects: simply call the transfrom method on your Bounds object.

var bounds = new OpenLayers.Bounds(-74.047185, 40.679648, -73.907005, 40.882078) bounds.transform(proj, map.getProjectionObject());

Transformations take place on the existing object, so there is no need to assign a new variable.

Reprojecting Geometries

Geometry objects have the same transform method as LonLat and Bounds objects. This means that any geometry object you create in your application code must be transformed by calling the transform method on it before you add it to a layer, and any geometry objects that you take from a layer and wish to use will need to be transformed before further use.

Because all transforms are in place, once you have added a geometry to a layer, you should not call transform on the geometry directly: instead, you should transform a clone of the geometry:

var feature = vector_layer.features[0]; var geometry = feature.geometry.clone(); geometry.transform(layerProj, targetProj);

Reprojecting Vector Data

When creating projected maps, it is possible to reproject vector data onto a basemap. To do so, you must simply set the projection of your vector data correctly, and ensure that your map projection is correct.

var map = new OpenLayers.Map("map", {   projection: new OpenLayers.Projection("EPSG:900913") }); var myBaseLayer = new OpenLayers.Layer.Google("Google",               {'sphericalMercator': true,                'maxExtent': new OpenLayers.Bounds(-20037508.34,-20037508.34,20037508.34,20037508.34)               }); map.addLayer(myBaseLayer); var myGML = new OpenLayers.Layer.GML("GML", "mygml.gml", {   projection: new OpenLayers.Projection("EPSG:4326") }); map.addLayer(myGML);

Note that you can also use this setup to load any format of vector data which OpenLayers supports, including WKT, GeoJSON, KML and others. Simply specify the format option of the GML layer.

var geojson = new OpenLayers.Layer.GML("GeoJSON", "geo.json", {   projection: new OpenLayers.Projection("EPSG:4326"),   format: OpenLayers.Format.GeoJSON }); map.addLayer(geojson);

Note that even if you set the projection object on a layer, if you are adding features to the layer manually (via layer.addFeatures), they must be transformed before adding to the layer. OpenLayers will only transform the projection of geometries that are created internally to the library, to prevent duplicating projection work.

Serializing Projected Data

The way to serialize vector data in OpenLayers is to take a collection of data from a vector layer and pass it to a Format class to write out data. However, in the case of a projected map, the data that you get from this will be projected. To reproject the data when converting, you should pass the internal and external projection to the format class, then use that format to write out your data.

var format = new OpenLayers.Format.GeoJSON({   'internalProjection': new OpenLayers.Projection("EPSG:900913"),   'externalProjection': new OpenLayers.Projection("EPSG:4326") }); var jsonstring = format.write(vector_layer.features);

Display Projection on Controls

Several controls display map coordinates to the user, either directly or built into their links. The MousePosition and Permalink control (and its companion control, ArgParser) both use coordinates which match the internal projection of the map – which in the case of Spherical Mercator layers is projected. To prevent user confusion, OpenLayers allows one to set a ‘display’ projection. When these controls are used, transformation is made from the map projection to the display projection.

To use this option, when creating your map, you should specify the projection and displayProjection options. Once this is done, the controls will automatically pick up this option from the map.

var map = new OpenLayers.Map("map", {   projection: new OpenLayers.Projection("EPSG:900913"),   displayProjection: new OpenLayers.Projection("EPSG:4326") }); map.addControl(new OpenLayers.Control.Permalink()); map.addControl(new OpenLayers.Control.MousePosition());

You can then add your layer as normal.

Creating Spherical Mercator Raster Images

One of the reasons that the Spherical Mercator projection is so important is that it is the only projection which will allow for overlaying image data on top of commercial layers like Google Maps correctly. When using raster images, in the browser, it is not possible to reproject the images in the same way it might be in a ‘thick’ GIS client. Instead, all images must be in the same projection.

How to create Spherical Mercator projected tiles depends on the software you are using to generate your images. MapServer is covered in this document.

MapServer

MapServer uses proj.4 for its reprojection support. In order to enable reprojection to Spherical Mercator in MapServer, you must add the definition for the projection to your proj.4 data directories.

On Linux systems, edit the /usr/share/proj/epsg file. At the bottom of that file, add the line:

<900913> +proj=merc +a=6378137 +b=6378137 +lat_ts=0.0 +lon_0=0.0 +x_0=0.0 +y_0=0 +k=1.0 +units=m +nadgrids=@null +no_defs

After you do this, you must add the projection to your wms_srs metdadata in your map file:

map   web     metadata       wms_srs "EPSG:4326 EPSG:900913"     end   end   # Layers go here end

This will allow you to request tiles from your MapServer WMS server in the Spherical Mercator projection, which will align with commercial provider data in OpenLayers.

var options = {     projection: new OpenLayers.Projection("EPSG:900913"),     units: "m",     maxResolution: 156543.0339,     maxExtent: new OpenLayers.Bounds(-20037508.34, -20037508.34,                                      20037508.34, 20037508.34) };  map = new OpenLayers.Map('map', options);  // create Google Mercator layers var gmap = new OpenLayers.Layer.Google(     "Google Streets",     {'sphericalMercator': true,      'maxExtent': new OpenLayers.Bounds(-20037508.34,-20037508.34,20037508.34,20037508.34)     } );  // create WMS layer var wms = new OpenLayers.Layer.WMS(     "World Map",     "http://vmap0.tiles.osgeo.org/wms/vmap0",     {'layers': 'basic', 'transparent': true} );  map.addLayers(gmap, wms);

WMS layers automatically inherit the projection from the base layer of a map, so there is no need to set the projection option on the layer.

GeoServer

Current versions of GeoServer have support for EPSG:900913 built in, so there is no need to add additional projection data. Simply add your GeoServer layer as a WMS and add it to the map.

Custom Tiles

Another common use case for spherical mercator maps is to load custom tiles. Many custom tile sets are created using the same projection as Google Maps, usually with the same z/x/y scheme for accessing tiles.

If you have tiles which are set up according to the ‘Google’ tile schema – that is, based on x,y,z and starting in the upper left corner of the world – you can load these tiles with the TMS layer with a slightly modified get_url function. (Note that in the past there was a ‘LikeGoogle’ layer in SVN – this is the appropriate replacement for that code/functionality.)

First, define a getURL function that you want to use: it should accept a bounds as an argument, and will look something like this:

function get_my_url (bounds) {     var res = this.map.getResolution();     var x = Math.round ((bounds.left - this.maxExtent.left) / (res * this.tileSize.w));     var y = Math.round ((this.maxExtent.top - bounds.top) / (res * this.tileSize.h));     var z = this.map.getZoom();      var path = z + "/" + x + "/" + y + "." + this.type;     var url = this.url;     if (url instanceof Array) {         url = this.selectUrl(path, url);     }     return url + path;  }

Then, when creating your TMS layer, you pass in an option to tell the layer what your custom tile loading function is:

new OpenLayers.Layer.TMS("Name",                        "http://example.com/",                        { 'type':'png', 'getURL':get_my_url });

This will cause the getURL function to be overridden by your function, thus requesting your inverted google-like tiles instead of standard TMS tiles.

When doing this, your map options should contain the maxExtent and maxResolution that are used with Google Maps:

new OpenLayers.Map("map", {     maxExtent: new OpenLayers.Bounds(-20037508.34,-20037508.34,20037508.34,20037508.34),     numZoomLevels:18,     maxResolution:156543.0339,     units:'m',     projection: "EPSG:900913",     displayProjection: new OpenLayers.Projection("EPSG:4326") });

As describe above, when using this layer, you will interact with the map in projected coordinates.

SphericalMercator and EPSG aliases

The SphericalMercator projection in OpenLayers uses code EPSG:900913. Many other services, such as OpenStreetMap, Bing and Yahoo are now also using the same projection, but are not necessarily supporting the use of code EPSG:900913. Other codes, such as EPSG:3857 and EPSG:102113 were invented. Today, there is an officially registered EPSG code 3857 whose projection is identical to EPSG:900913. (http://www.epsg-registry.org/export.htm?gml=urn:ogc:def:crs:EPSG::3857). So, if you need to combine overlay layers that are using either an alias or the official EPSG code with an OpenLayers SphericalMercator layer, you have to make sure that OpenLayers requests EPSG:3857 or other alias in stead of EPSG:900913. You can accomplish this by overriding the layer projection before adding the layer to the map. For example:

// create sphericalmercator layers var googleLayer = new OpenLayers.Layer.Google("Google", {"sphericalMercator": true}); var osmLayer = new OpenLayers.Layer.OSM("OpenStreetMap");  // override default epsg code aliasproj = new OpenLayers.Projection("EPSG:3857"); googleLayer.projection = osmLayer.projection = aliasproj;   //add baselayers to map map.addLayers([googleLayer, osmLayer]);

At this point, overlays (such as WMS layers) will be requested using the 3857 code; transformations will work between 4326 and 3857 as expected.

Qtranslate tutorial

by Karine in WordPress

Here is a quick Qtranslate tutorial for those who are a bit lost. I don’t know if it’s the best plugin for a multilanguage website, it depends on your needs, but for me, it was by far the best choice! 😀

  • Have the same URL for posts (write only one post, not several)
  • Be able to translate everything: categories, templates, etc.
  • Clean URL: /en/postname for example

Cons:

  • The post URL is only in one language => this if fixed with qtranslate-slug plugin

Installation

Install Qtranslate and choose the languages you want to enable/disable or delete.

Qtranslate languages

In the advanced options, you can choose the type of URL you want. I chose pre-path mode because it’s prettier.

Qtranslate url

If you already have categories and tags, you will have to edit them to translate them. When you add new categories, don’t forget their translations !

Qtranslate tags

Usage

Note: I will use x1 and x2 instead of en and fr to not mess up my codes (since Qtranslate recognize them if I put en & fr).

How to change the blog title?

Just write [:x1]English title[:x2]Titre français directly in the blog title input on WordPress. x1 and x2 are your languages of course (en and fr for example). It should also work for widgets and some plugins like All in One SEO Pack.

How to insert multilanguages text in my theme ?

_e('[:x1]English text[:x2]Texte en français');

You can use this code for almost everything. Let’s say a different stylesheet for each language:

_e('[:x1][:x2]');

How to translate WordPress template tags ?

Let’s translate the_content() :

the_content(__('[:x1]Lire la suite[:x2]Read more'));

This code snippet will show the correct translation of the “Read more” text if you have decided to show only excerpts on your blog. An other example with edit_post_link() :

edit_post_link(__('[:x1]Modifier[:x2]Edit'), '', ' | ');

How to display a language chooser with flags ?

Insert this code wherever you want the language chooser to be:

echo qtrans_generateLanguageSelectCode('image');

You can style it with CSS:

.qtrans_language_chooser { list-style-type:none; }
.qtrans_language_chooser li { float : left; margin-right: 20px; }

If you want to only display the flag of the inactive language, add this code to your CSS:

.qtrans_language_chooser li.active { display : none; }

If you don’t want flags and simply text, use this code instead:


echo qtrans_generateLanguageSelectCode('text');

Client Templating with jQuery

jQuery makes it pretty easy to manipulate client side elements, so it’s not all that often that I think about using something like client side templating to get content loaded into pages. However, recently I have been working on a few apps that had fairly complex list based layouts and it started getting tedious to use manual code to update all the items. Further doing it by hand can be brittle if your layout changes as you have to keep the layout and the update code in sync.

Templating can address this problem by letting you use templates that describe your output with ‘holes’ that are filled in with data when the template is processed. Templating is a good solution in a few scenarios:

Loading all data from the server especially in rich list displays
Adding or updating new items in lists
Anywhere you need to add new complex content to the page
Anything that requires client side HTML rendering

All of these scenarios have in common that new items are created and these items are injected into the page from the client.
‘Manual’ Templating

Templating can take many forms actually and it may not even require an official templating engine to feed data into the page. For example in a number of applications I’ve been using hidden elements that serve as a template into which data is then filled manually via jQuery code. Take this layout for example:

TemplateManual

which is filled from a ‘manual’ template that looks like this:

The ‘template’ is a single hidden element in the page that is the empty layout of each of the template items that is loaded without any data applied to it. When the items are loaded from the server via an AJAX callback an array of Stock items are retrieved and they are then merged via code that finds each element and assigns the value.

function LoadQuotes()
{
if (!userToken)
return; // *** not logged in

proxy.invoke(“GetPortfolioItems”,
{userToken: userToken },
function( message ) {
$(“#lstPortfolioContainer”).empty();

$.each( message.Items,function(i)
{
var item = this; // this is the iterated item!

// *** Create a new node from the template by cloning
var newEl = $(“#StockItemTemplate”).clone()
.attr(“id”,item.Pk + “_STOCK”)
.fadeIn(“slow”);

// *** dump the data into it
UpdatePortfolioItem(newEl,item);

// *** Append item to the list view container and hook up click event for detail
newEl.click(function() { ShowStockEditWindow(newEl); } )
.appendTo(“#lstPortfolioContainer”);
});

// *** Update totals
$(“#spanPortfolioTotal”).text( message.TotalValue.formatNumber(“c”) );
$(“#divPortfolioCount”).text( message.TotalItems.formatNumber(“f0″) + ” items”);
},
OnPageError);
}

function UpdatePortfolioItem(jItem,stock)
{
// *** Now fill in the stock data
jItem.find(“.itemstockname”).text(stock.Symbol + ” – ” + stock.Company);
jItem.find(“#tdLastPrice”).text(stock.LastPrice.toFixed(2));
jItem.find(“#tdLastQty”).text(stock.Qty.toFixed(0));
jItem.find(“#tdItemValue”).text(stock.ItemValue.formatNumber(“c”));
jItem.find(“#tdTradeDate”).text(“as of: ” + stock.LastDate.formatDate(“MMM dd, hh:mmt”) );
}

The manual templating works by cloning the template element, assigning a new ID to it, filling it with data and then injecting it into the document in the right place – in this case into the list container.

This is a code centric approach and it’s pretty straight forward albeit a bit tedious and as mentioned potentially brittle if the template is changed.

Copy and Fill Templating

A similar approach that doesn’t require a separate template can be used if you need to add or update items in a list. Rather than cloning an empty template that is separately loaded into the page (and which some Html purists would complain about for document clarity) you can pick up an existing item on the page and duplicate it.

So in the example above instead of cloning a template I can select the first div tag and clone it:

var newEl = $(“#lstPortfolioContainer>div:first-child”).clone()
.attr(“id”, item.Pk + “_STOCK”);

This works as long you start off with existing content and you’re guaranteed that SOME content exists to clone from.

In the example above this wouldn’t work because the list renders initially empty and is filled from the client, but the copy and fill can work well in forms where you add new items or update existing ones and avoids any template embedding into the page. This can be especially useful for ASP.NET applications that fill lists with data server side and you only need to update or add items.

Although this approach doesn’t work for everything, when it does work it can be a great time saver because you don’t have to duplicate anything as you are simply reusing what was already rendered server side. I’ve used this frequently for client side updates of grids for example.
jTemplates

Manual embedding works, but as you can see it can be a bit tedious to find and update each item

There are few template engines available for jQuery and the one I’ve used for a while is jTemplates. jTemplates is fairly easy to use and it works reliably, although I have to say that I’m not a fan of the python like template syntax. But it works and is fairly powerful in terms of what you can accomplish. jTemplates work by taking the template and turning it into Javascript code that gets executed which means that template placeholder items can include expressions that reference other code.

Let’s look at another example. Here’s a form that’s my admin form my currently reading list on this blog. The list is originally rendered with a ListView control on the server. I can then go in and add or edit items which pops up ‘dialog’ ontop of the existing content:

jtemplate1

When the Save button is clicked the book list is updated or a new item added using jTemplates. The jTemplates template for an individual item looks like this:

Note the little trick of using a

which is hooked up with code like this:

function showAmazonList()
{
panBookList_DragBehavior.show();
var search = $(“#txtSearchBooks”).val();
if (!search)
return;

showProgress();
Proxy.GetAmazonItems( search,
$(“#” + scriptVars.radSearchTypeId + ” input:checked”).val(),
$(“#” + scriptVars.txtAmazonGroupId).val(),
function(matches) {

showProgress(true);
bookList = matches;
var item = $(“#divBookList_Content”);

item.setTemplate( $(“#amazon_item_template”).html() );
item.processTemplate(matches);
},
onPageError);
}

Matches in this case is an array of AmazonLookupItems which looks like this:

[CallbackMethod]
public List GetAmazonItems(string search, string type, string amazonGroup)
{
AmazonLookup lookup = new AmazonLookup();
List result = lookup.SearchForBook(
(type == “Title”) ?
Amazon.AmazonLookup.SearchCriteria.Title :
Amazon.AmazonLookup.SearchCriteria.Author,
search,
amazonGroup);

//result[0].

return result;
}

The result is serialized as an array which is what

{#foreach $T.Rows as row}

{#/for}

iterates over.

You can also a see an example of the #if construct which allows you to conditionally display content.

{#if $T.Highlight}Highlighted{#/if}

jTemplate supports only a few #directives including #if,#foreach,#for,#include,#param,#cycle which are few but admittedly enough for the most common template scenarios.

I’ve used jTemplates in a few applications and it works well, but the syntax is really not to my liking. I also am not terribly fond of the way the plug-in works and how it assigns content as content. Making a tool like this a jQuery plug-in rather than a class that produces string output or at least allows options for that is one example of overemphasizing the jQuery metaphor.
John Resig’s Microtemplating engine

A couple of months ago John Resig posted a tiny little templating engine that is positively tiny. This engine is literally 20 lines of very terse (and yes obtuse) code. Heck I’ve looked at the regex expressions for a while now and I still have not quite figured out what it all does. It’s short enough I can post it here:

Updated code that fixes issue with single quotes (per Neil’s comment below):

// Simple JavaScript Templating
// John Resig – http://ejohn.org/ – MIT Licensed
(function() {
var cache = {};

this.tmpl = function tmpl(str, data) {
// Figure out if we’re getting a template, or if we need to
// load the template – and be sure to cache the result.
var fn = !/\W/.test(str) ?
cache[str] = cache[str] ||
tmpl(document.getElementById(str).innerHTML) :

// Generate a reusable function that will serve as a template
// generator (and which will be cached).
new Function(“obj”,
“var p=[],print=function(){p.push.apply(p,arguments);};” +

// Introduce the data as local variables using with(){}
“with(obj){p.push(‘” +

// Convert the template into pure JavaScript
str.replace(/[\r\t\n]/g, ” “)
.replace(/'(?=[^%]*%>)/g,”\t”)
.split(“‘”).join(“\\'”)
.split(“\t”).join(“‘”)
.replace(/<%=(.+?)%>/g, “‘,$1,'”)
.split(“<%”).join(“‘);”)
.split(“%>”).join(“p.push(‘”)
+ “‘);}return p.join(”);”);

// Provide some basic currying to the user
return data ? fn(data) : fn;
};
})();

Basically it turns a template into a block of JavaScript code and then executes that code. The syntax is ASP style markup using <%= expression %> and <% codeblock %> syntax to handle code embedding.

What’s nice about this approach is that you can utilize any Javascript in the template and you’re not limited to just a few commands. The other thing that’s really nice is that it’s really compact – in fact I’ve integrated it into my own client library with a couple of small modifications. The main change I had to make for myself is that I can’t use <% %> because I’m using the script in another library where <% %> is always evaluated as server side script (note – ASP.NET is fine with the <% %> as long as you put it inside

You can also loop through a list of items by using code blocks. Imagine you got a list of stocks returned as an array as I showed earlier. You can then do:

var s = parseTemplate($(“#StockListTemplate”).html(), { stocks: message.listresult.Rows } );

which is then applied against this template

Effectively any child properties of the passed object are available as variables in the template courtesy of the with() construct in the generated Javascript code.

Personally I prefer to do scripting this way to what jTemplates does simply because you effectively have access to full Javascript functionality in the template. It’s also a more familiar approach if you’ve used any sort of ASP.NET scripting.

To put this in perspective here’s the first example where I manually loaded up the stock template replaced with the parseTemplate approach. In this example I use a single item template and use code to loop through list rather than having the template do it

The following is a script template similar to the stock template in the first example:

In this example the template is loaded either individually or updated in a loop to load all quotes:

function LoadQuotes()
{
Proxy.callMethod(“GetPortfolioItems”,
[],
function(message) {
$(“#lstPortfolioContainer”).empty();

if (!message)
return;

if (message.listresult) {

// Parse template with stock rows as array input
var html = parseTemplate($(“#ItemTemplate”).html(),
{ stocks: message.listresult.Rows });
$(html).fadeIn(“slow”)
.appendTo(“#lstPortfolioContainer”);
}

// *** Update totals
$(“#spanPortfolioTotal”).text(message.totalvalue.formatNumber(“c”));
$(“#divPortfolioCount”).text(message.totalitems.formatNumber(“f0″) + ” items”);
},
OnPageError);
}

As you can see the Javascript code has been reduced significantly and the template – to me at least – is very easy to parse understand modify.

A problem with Single Quotes

As nice as the MicroTemplating engine is there is one problem: The parser has problems with templates that contain single quotes as literal text in some cases. The RegEx expression tries to allow for single quotes and it does in some cases work. But if you use single quotes to wrap attribute values the parser will fail with an ugly string error in the parseTemplate function because the single quote will end up as the delimiter for the function string resulting in invalid Javascript code to evaluate.

While this isn’t a big issue since it should be easy to avoid single quotes in markup and you can use &rsqutoe; for quote literals in HTML markup it’s still a bit inconsistent.

Updated code that fixes issue with single quotes (per Neil’s comment below)
Other Javascript Templating

Microsoft is also at it again as well with a new client template engine slated for Version 4.0 of ASP.NET. MS originally had client side templates in ATLAS which were later pulled – a good thing this didn’t make it because the XML based markup script was painful to work with with a hideous repetitious and self referencing model that was confusing as hell. The new template engine looks a lot cleaner and is bound and generally follows the same principles that I’ve shown above with jTemplates or the John Resig’s MicroTemplate parser.

Dave Ward has a great blog post with a sample that shows the basics of client templates and Bertrand also has an article on these templates in MSDN in the current issue. BTW, if you like the jQuery content here make sure you also subscribe to Dave’s RSS feed – he’s got some kick ass content on jQuery and ASP.NET.

I haven’t had a chance to look at this stuff other than reading through the articles. While I think this stuff looks very promising I can’t I’m too excited about it – mainly because it still relies on the rest of the Microsoft Client Library. Just to do scripting that’s a bit much of a hit especially when I already have alternatives in this space. But if you’re already using ASP.NET AJAX then the new features are a natural path to take.
Client Templating – Great for pure Client Implementations

I’m glad to see that there are a few templating solutions available. Templating makes creating pure client interfacing much easier and it brings some of the concepts that you might be familiar with ASP.NET server applications closer to home. After all things like the ListView, Repeater and other repeating controls are essentially template engines and many similar concepts are used in the client engines. Templates make it possible to let you render rich UI on the client without server markup and yet still let you keep the markup in one place (the template) and even lets you edit the content in your favorite designer if you choose to place the template into a regular document element that maybe is merely invisible.

Personally I like the approach of the MicroTemplate best because it’s dead simple and hits the right notes for me. I don’t need a fancy templating language if I can use JavaScript in my template to perform simple structural blocks and looping. No need to learn some funky template markup language but rather use what you know

Using jQuery with ASP .NET

Published: 08 Feb 2009
By: Xun Ding
Download Sample Code

A brief introduction to jQuery and ways in which we can integrate it into ASP .NET

Introduction

In September 2008 Scott Guthrie, the head of the ASP.NET team, announced in a blog post that Visual Studio would be shipping with the jQuery library. He writes:

“jQuery is a lightweight open source JavaScript library (only 15kb in size) that in a relatively short span of time has become one of the most popular libraries on the web. A big part of the appeal of jQuery is that it allows you to elegantly (and efficiently) find and manipulate HTML elements with minimum lines of code … There is a huge ecosystem and community built up around JQuery. The jQuery library also works well on the same page with ASP.NET AJAX and the ASP.NET AJAX Control Toolkit.”

With that, JQuery is officially embraced by ASP.NET.

A brief introduction of JQuery

jQuery is the star among the growing list of JavaScript libraries. A few of its characteristics are light-weight, cross-browser compatibility and simplicity. A common task that sometimes takes 10 lines of code with traditional JavaScript can be accomplished with jQuery in just one line of code. For example, if you want to dress up a table with an ID mytable with alternative color for every other row, you can simple do this in jQuery.

Listing 1: jQuery code for making a zebra-style table
1.
The magic dollar sign ($) and a chain of operations

In jQuery, the most powerful character / symbol is the dollar sign. A $() function normally returns a set of objects followed by a chain of operations. An example
1.$(“div.test”).add(“p.quote”).html(“a little test”).fadeOut();

Think of it as a long sentence with punctuations. Indeed it is a chain of instructions to tell the browser to do the following:

Get a div with class name is test;
Insert a paragraph with class name is quote;
Add a little text to the paragraph;
Operate on the DIV using a predefined method called fadeout.

So there it is, the first two basics: $() and chainable.
jQuery Selectors

JQuery uses CSS selectors to single out one element or a group of elements, and normally we use a combination of them to target specific elements. For example:

$(‘p.note’) returns all

elements whose class name is note;

$(‘p#note’) returns the

element whose id is note;

$(‘p’) returns all

elements

To select a child or children, we use the right angle bracket (>), as in $(‘p>a’) (returns all of the hyper links within the

element);

To select element(s) with certain attributes, we use [], as in input[type=text] (returns all text input element);

To select a container of some other elements, we use has keyword, for example: $(‘p:has(a)’) (returns all

elements that contains an hyperlink);

jQuery also has a position-based selector for us to select elements by position, for example $(‘p:first’)
Document.Ready()

The most commonly used command in jQuery is Document.Ready(). It makes sure code is executed only when a page is fully loaded. We often place code blocks inside this Document.Ready() event. For example:
1.$(document).ready(function(){
2.$(“#buttonTest”).click(function(event){
3.alert(“I am ready!”);
4.});
5.});

So far, we have brushed upon a bit of the core jQuery library. The true power of jQuery lies in its speed and flexibility and extendibility, and the ever-growing however already immense collection of jQuery plugins that deal with tasks big and small. As of today, by the tally of jQuery.com, there are 1868 plug-ins, including 100 in AJAX, 123 in Animation and effects, 66 in data, 321 in user interface. After all, JQuery is designed to be small and nimble, providing only the core functionalities required in the most common scenarios, and make others available only when needed and serve in the form of a plug-in.
ASP .NET and JQuery

Long gone is the era when most computing was done on a desktop, when web pages were more or less like virtual bulletin board. Now the impatient and internet-saturated generation is insatiable with substance, dynamics and connectivity. They want rich content, dazzling visual and instant feedback. More than ever, web development has become a tight coordinated dance between server and client. The server does the heavy lifting in the background, processes requests, churns up data and passes it back to the requesting client; from which point the client computer takes over. Interactions now taken place between web and user would be taken care by client side script, and web server would only be involved when client initiates a new request for data operation. The introduction and adoption of AJAX (the technique of performing asynchronous requests through client scripts) is fueled by and fuels this trend.

While AJAX is now the unifying technique across browsers (IE or Firefox), platforms (PC or MAC) and languages (C# or Java or PhP), it did not launch onto this popularity train until just a few years ago, when Google showcased its power with an array of applications. So with Google maps, Gmail, Google news, AJAX becomes the gold messenger of server and client communication. As if overnight, more than 100 AJAX libraries sprung up to simplify and smooth this process.

jQuery is one of the more effective and light-weighted ones. ASP .NET team has come up with its own AJAX and JavaScript libraries in its unifying ambition to convert every programmer (be it C# or VB or something else) into a Microsoft faithful. However, its JavaScript library is considerably bulky, bandwidth-costly and poses a steep learning curve.

On the other hand, ASP .NET has always been predominantly a server side technology, web services and code behind page methods have always been the founding stones of web applications. The development of ASP .NET AJAX helps developers to easily make service calls from client side script.

Let’s take a look at how we can use jQuery to consume ASP .NET web services and page methods.
Consuming ASP .NET web services using jQuery

From the conception to now, web services has gone a long way. Web services use XML as the default data exchange format and SOAP as its protocol. However it has long been dogged by complaints of complexity and lack of open standards. XML as its default message format often feels cumbersome and bandwidth-heavy.

However, with AJAX, JSON overtook XML as a more efficient alternative. It retains all of the advantages claimed by XML, such as being readable and writable for humans, and easy to parse and generate. JSON, though completely language independent, borrows a lot of conventions from languages such as C, C++, C#, Java, JavaScript, Perl, Python, etc. This makes JSON an instant hit among programmers.

Tailored to accommodate this trend, data returned from ASP .NET web script services are by default in JSON format.
JSON serialized web service

The following is a dummy ASP .NET web service. Please note that this service is adorned with the ScriptService attribute that makes it available to JavaScript clients.
Listing 2: A Dummy web service
01.[WebService(Namespace = “http://tempuri.org/&#8221;)]
02.[WebServiceBinding(ConformsTo = WsiProfiles.BasicProfile1_1)]
03.[System.Web.Script.Services.ScriptService]
04.public class dummyWebservice : System.Web.Services.WebService
05.{
06.[WebMethod()]
07.public string HelloToYou(string name)
08.{
09.return “Hello ” + name;
10.}
11.[WebMethod()]
12.public string sayHello()
13.{
14.return “hello “;
15.}
16.}

If we call the method sayHello and then use Firebug for Firefox to check the server response, it would look like this:

A call (GET or POST) to ASP .NET JSON-serialized web services must meet two criteria:

It must carry a HTTP Content-Type header with its value set to application/json
It must be called via the HTTP POST verb or else the request would be rejected. To submit a GET request, we just need to submit empty data string.

Consuming a web service using ASP .NET AJAX

It is easy to call web services with the native ASP .NET AJAX, which would automatically take care all of the gritty details. It takes two steps:

First, add a ServiceReference to the ScriptManager control in the web form, as such:
1.
2.
3.
4.
5.

Second, call any web methods defined in the web service by passing the necessary parameters and a callback function. The callback will be invoked once the data is returned from server. The following is a complete example of how we call a web service using ASP .NET AJAX.
Listing 3: Calling a web service using ASP .NET AJAX
01.<%@ Page Language=”C#” %>
02.<%@ Import Namespace=”System.Web.Services” %>
03.04.”http://www.w3.org/TR/xhtml1/DTD/xhtml1-transitional.dtd”&gt;
05.
06.
07.
08.
10.
19.
20.
21.

22.
23.
24.
25.
26.
27.

ASP.NET AJAX Web Services: Web Service Sample Page

28.Enter your name:
29.
30.

31.32.type=”button” onclick=”OnSayHelloClick();” />
33.
34.
35.

However as we have mentioned before, ASP .NET AJAX is rather heavy-handed and carries hefty performance penalties. In comparison, jQuery is superior in its promise of “less code do more”.

However how do call ASP .NET web services using jQuery?
Consuming a web service using jQuery

The answer: use the jQuery command ajax with the following syntax:
1.$.ajax (options)

It looks deceivingly simple. However, you can stuff a lot of specifics in this umbrella parameter options, such as the required ones: url of the web service (url), request content type (contentType), response data type (dataType), callback function for success (success); and the optional ones: callback function in case of failure (error), a timeout for the AJAX request in milliseconds (timeout), etc.

For example, we can call a specific web method in a web service as such.
Listing 4: JQuery .ajax command
1.$.ajax({
2.type: “POST”,
3.contentType: “application/json; charset=utf-8”,
4.url: “WebService.asmx/WebMethodName”,
5.data: “{}”,
6.dataType: “json”
7.});

Two things are worth noting in the above JQuery AJAX call. First, we must specify the contentType’s value as application/json; charset=utf-8, and the dataType as json; second, to make a GET request, we leave the data value as empty.

So put it together, the following code demonstrates how we would use JQuery to call the web service we created above.
Listing 5: Calling a web service using jQuery
01.<%@ Page Language=”C#” %>
02.<%@ Import Namespace=”System.Web.Services” %>
03.04.”http://www.w3.org/TR/xhtml1/DTD/xhtml1-transitional.dtd”&gt;
05.
06.
07.
08.
10.
33.
34.
35.

36.

Calling ASP.NET AJAX Web Services with jQuery

37.Enter your name:
38.
39.

40.41.type=”button” />
42.
43.
44.
Calling an ASP .NET page method

In terms of AJAX calls, a page method and a web service are almost interchangeable. Page methods, as the name suggests, is page dependant. Rather than creating a stand-alone web service, you can simple code a server-side method for data fetching and processing and call it from your client-side script.

Here is how.
A dummy page method

The following is the code sample of a dummy page method that takes no parameters
Listing 6: A dummy hello world page method
1.[WebMethod()]
2.public static string sayHello()
3.{
4.return “hello “;
5.}

Please note that page methods must be declared as static, meaning a page method is completely self-contained, and no page controls are accessible through the page method. For example, if you have a textbox on the web form, there is no way the page method can get or set its value. Consequently any changes with regards to the controls have no affect on the page method. It is stateless and it does not carry any of the view-state data typically carries around by an asp .NET page.
Calling a page method from jQuery

We use the same jQuery command $.ajax to call a page method, as shown in the following example.
01.
Client Templating

In ASP .NET, server side controls can be bound to a data source. Those controls are essentially presentation templates. Many web applications have more or less abandoned the server-centric programming model of ASP .NET. As a result, we have to retake up the tasks of doing our own plumbing, of iterating through data and stuffing it in the right slot.

So for example, if we want to populate a table with data obtained from a web service, without a proper template, we have manually iterate through records and weave all of the data into a long string, peppered with events.

Let’s say we have a web service that returns a CD catalog, as such:

To display the data in a table, we might do the following
Listing 7: Data presentation without a template
01.function BuildTable(msg) {
02.var table = ‘
03.
04.
05.
06.
07.’;
08.for (var cd in msg) {
09.var row = ”;
10.row += ”;
11.row += ”;
12.row += ”;
13.row += ”;
14.row += ”;
15.table += row;
16.}
17.table += ‘

Artist Company Title Price
‘ + msg[cd].Artist + ‘ ‘ + msg[cd].Company + ‘ ‘ + msg[cd].Title + ‘ ‘ + msg[cd].Price + ‘

‘;
18.$(‘#Container’).html(table);
19.}
How to use jTemplate

A much better alternative is that we use a template engine. jQuery has a few template plugins, the most widely accepted is jTemplate. jTemplate is a JQuery template engine that works with AJAX and JSON data. We can use Jtemplate in the following steps:

First, download the JQuery JavaScript file and reference it in your web page:
1.

Second, define your template:
01.

Please note that we define the template in a script block, which can be accessed by its id; also,“jTemplates uses python like syntax and the $T is a reference to the data item passed to the template. Data can be passed in as an object and you can reference the object’s properties off this $T data item.” (Rick Strahl)

Third, call your web service in your script, designate the template and instantiate it with data.
01.$(document).ready(function() {
02.$.ajax({
03.type: “POST”,
04.url: “CDCatalog.asmx/GetCDCatalog”,
05.data: “{}”,
06.contentType: “application/json; charset=utf-8”,
07.dataType: “json”,
08.success: function(msg) {
09.//instantiate a template with data
10.ApplyTemplate(msg);
11.}
12.});
13.});
14.function ApplyTemplate(msg) {
15.$(‘#Container’).setTemplate($(“#TemplateResultsTable”).html());
16.$(‘#Container’).processTemplate(msg);
17.}
Figure 4: Using jTemplate to display a CD catalog

Using jTemplate to display a CD catalog
ASP .NET client templating engine

In July 2008, the ASP .NET team also announced its own client template engine, as blogged by Bertrand Le Roy. It uses {{expression}} as place holder for data, it works with JavaScript and AJAX. The ASP .NET client template engine also allows live bindings (dynamic data refreshing and updates). For more information, please read Using client templates, part 2: Live Bindings.

The following is how we can populate an ASP .NET client template engine with the data we get from the above CD catalog web service.
Listing 8: ASP .NET AJAX client templating engine
01.
02.
03.
04.
05.
06.
07.
08.
09.
10.
11.
12.
13.
14.
15.
16.
17.
18.
19.
20.
21.
22.
23.
24.

Artist Company Title Price
{{Artist}} {{Company}} {{Title}} {{Price}}

25.
26.
27.
28.
37.
38.

As we can see, the ASP .NET client template engine is very simple and elegant. However, it is still at its early stage. The template is still lacking in flexibility and it still waits to be widely tested and accepted by the developers community.
Summary

With the marching forward of AJAX to the forefront of building rich interactive web sites, jQuery as the lightweight yet powerful JavaScript library also gains ever more prominence. In late 2008, Microsoft ASP .NET officially partners with jQuery to develop better and more efficient approaches to speed and smooth the communication between servers and client. Reflecting on the trend of harnessing the best of the web, this article paints in broad strokes some of the characteristics of jQuery and how we can integrate jQuery into ASP .NET.
References

jTemplates with jQuery, AJAX and Json
Client Templating with jQuery
Using client templates, part 1
Using client templates, part 2: Live Bindings
jQuery official web site
Using jQuery to directly call ASP.NET AJAX page methods | Encosia